
The Atari VCS is now arriving in the hands of backers. I got mine yesterday (December 21, 2020) at about midday and I’ve spent most of my waking hours working with it. At a later date I will post a review, but there are more pressing matters for others who are also just now receiving their VCS units. One of the most anticipated features of the VCS for some users is PC Mode, where you can install another OS and have full access to the hardware for any purpose you wish. This makes playing your Steam library an option in either Windows or Linux (the VCS can run either).
This article details how to install Ubuntu 20.04 LTS on an external USB drive on the Atari VCS, as well as how to install Steam as well as a very important fix for proper graphics rendering.
DISCLAIMER: follow these steps at your own risk. Read all of the steps carefully before you begin and make sure you are comfortable with this sort of work. I cannot be held responsible if your VCS becomes inoperable (although having said that, it is possible to recover the original OS, but there is no official documentation on that yet).
Atari has posted their own official documentation on how to create a Linux boot drive (either Ubuntu or Debian) for the VCS. However I would like to elaborate on the process and include a few things that are not in the documentation. Atari’s official documentation can be found here:
https://shop.atarivcs.com/content/Linux-Install-Guide.pdf
The process will require the following:
- A USB drive to use for the installer (which I’ll call the “Installer Drive”)
- A USB drive where the Ubuntu OS will be installed (which I’ll call the “OS Drive”)
- An Atari VCS
For my USB drives, I use a 64 GB USB 3 Sandisk thumb drive for the Installer, and a 2 TB USB 3 Western Digital Passport external HDD for the OS drive.
Step 1 – Download Ubuntu 20.04 LTS
Download the most recent Ubuntu 20.04 image, which at the time of this writing can be found here:
http://www.releases.ubuntu.com/20.04/ubuntu-20.04.1-desktop-amd64.iso
Step 2 – Create the USB Installer Drive
First, you’ll need a USB drive to use as the install media. You can use any drive 8 GB or larger, but using a faster one (USB 3.0 or newer) will reduce the amount of time the install takes.
Insert the USB drive into your computer. Next, we’ll write Ubuntu install image to it.
I’m going to recommend using a free utility called “balena Etcher” to create the USB installer. While this is not the only tool that can be used to create bootable USB media, it is very easy to use and available on MacOS or Windows (Linux users, I assume you know what you’re doing).
Once installed, open balena Etcher. First, choose the Ubuntu ISO image you downloaded in the first step. Then choose the USB drive you selected for the install media. Lastly, click the button to write the image to the drive. It’s very easy.
Step 3 – Boot the VCS from the USB Installer Drive
With the VCS powered off, insert both the USB installer drive created with balena Etcher, and the USB drive where you’ll be installing Ubuntu (the OS Drive). Also be sure to attach a USB keyboard and mouse. You’ll need those to get into the installer and to perform the install.
Power on the VCS. Keep pressing the Escape key as the VCS powers on. You will eventually get to a BIOS/UEFI screen. Choose “Boot Manager”.
You should see the USB installer drive listed here among a few other boot options. Using the arrow keys, choose this option and press Enter.
The VCS should start booting the Ubuntu installer. Depending on the speed of your drive, this can take a few minutes. Let the process continue until you have the choice to “Try Ubuntu” or “Install”. Click “Try Ubuntu”. This will continue to boot into a live Ubuntu system.
Step 4 – Partition the OS Drive
There are probably a few options here, but I’ll relate the method that I used.
After the live Ubuntu system has finished booting, click on “Activities” in the upper left of the screen. In the search field that appears in the middle, type: gparted, then click on the icon that appears. This is a disk partitioning tool.
Partitioning a storage device is like dividing it into multiple sections for different uses. You will need 3 partitions.
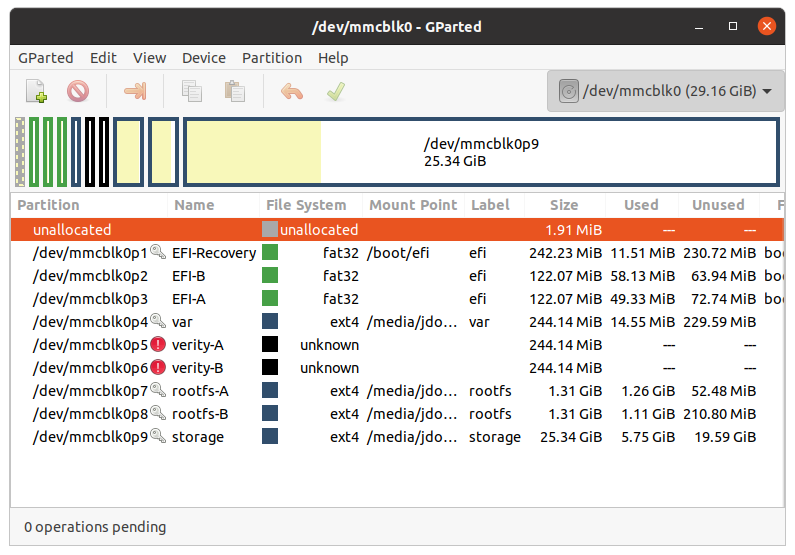
VERY IMPORTANT!!! The first thing you must do is select the device you wish to partition using the drop-down menu in the upper right. It will default to selecting a device with the name /dev/mmcblk0. This is the internal storage of the VCS and you DO NOT WANT TO ALTER IT. So changing it is very important. Select your OS drive. You should also see the USB Installer drive listed here. Do not choose that one either. See the image below, and the drop down in the upper right to see the setting I mean. If you see this, you have the wrong device selected.
Now, depending on your history with this drive, you may have a task or two to perform. If you’ve used this drive before, you may need to delete existing partitions. This WILL destroy all the data on the drive so make sure you can commit to using this drive. If this is the case, you should see some partitions listed, Right-click on each one and choose “Delete” to remove those partitions. When they are all removed, you should see only one item in the list that says “unallocated”, and the size of the drive should be listed. You may need to click the green checkmark to apply these changes before moving on.
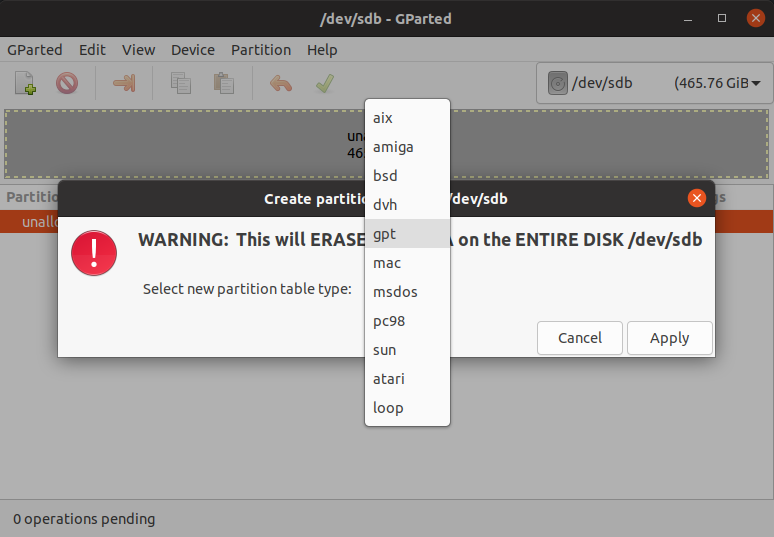
If it is a brand new drive, you may need to create a new partition table. In fact, this might not be a bad idea in the first place. Go to the “Device” menu and choose to “Create a New Partition Table”. Then choose “gpt”. You will get a dialogue warning that you will lose data when performing this step. As long as you have the OS drive selected, that’s exactly what we want.
Once the new partition table has been created, it is time to create partitions. We will need three.
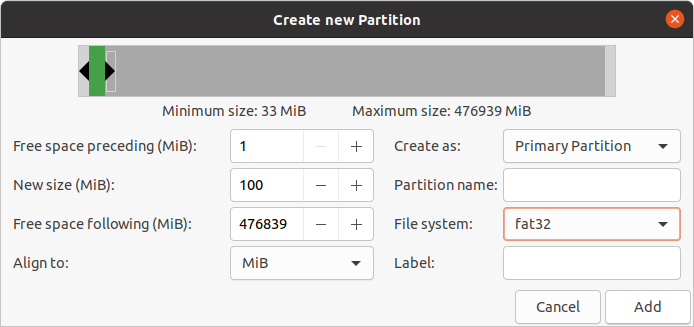
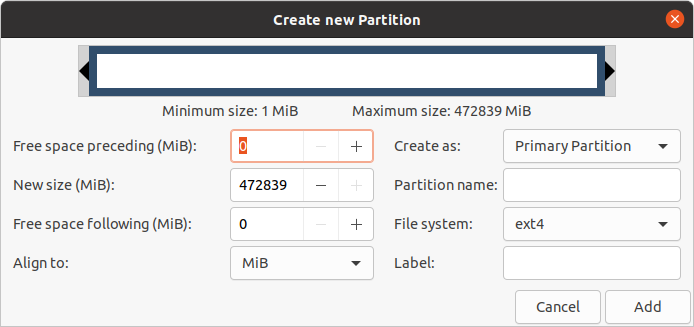
EFI
The first partition is for the EFI boot files so this drive will be recognized as bootable. Right click on “unallocated” and choose “New”. Create a 100 MB partition using FAT32 format. See the image below.
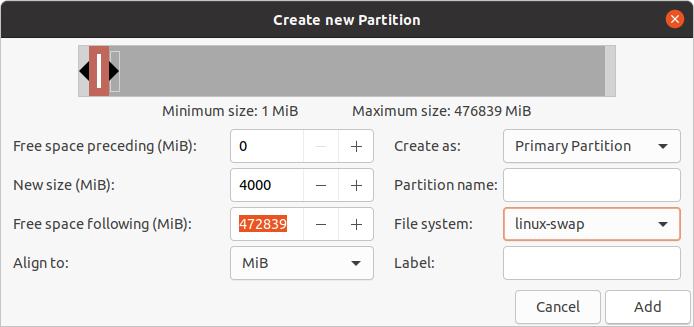
Swap
Next is a “swap” partition that Linux uses for virtual memory. Again, right-click on “unallocated” and choose “New”. Create a 4000 MB partition using the linux-swap format. See the image below.
Root
The final partition is where our OS and data files will go, called the Linux “Root” partition. Right-click on “unallocated” and simply choose “ext4” format. It will default to using the rest of the space on the drive so you don’t need to specify this. See the image below:
Once the three partitions are created, click the green checkmark to apply those changes, then you can close gparted.
Step 5 – Install Ubuntu to the Freshly Partitioned OS Drive
Once gparted has been closed, click on the desktop icon to Install Ubuntu. This will begin taking you through the Ubuntu install process.
Many of these steps are fairly intuitive so I won’t be covering them. They include things like creating a user account, giving the system a name, entering your time zone and such.
There are a few very important parts however. They are as follows:
Updates and Other Software
When you get to this screen, the main item to check is “Install Third Party Software for Graphics and Wi-Fi…“. While I’m not positive this is absolutely required, I checked it due to some of the hardware in the VCS.
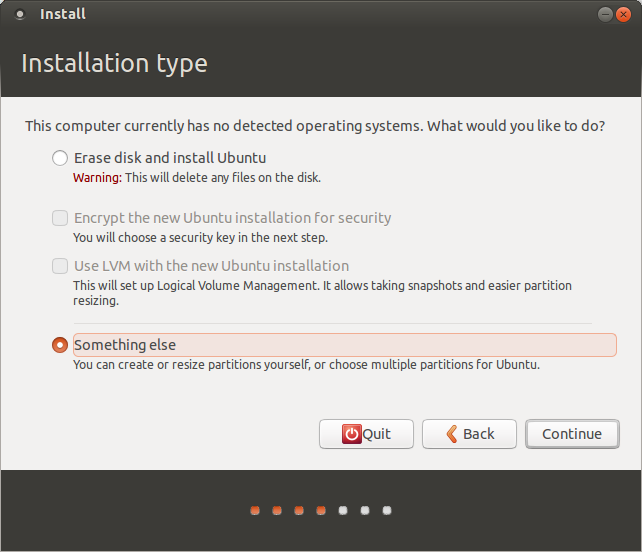
Installation Type
On this screen, be sure to choose “Something Else” as shown below.
On the next screen, there is a VERY important setting. Under “Device for boot loader installation”, make sure that your target Ubuntu OS drive (the one that you partitioned earlier) is selected. Make sure that it is NOT /dev/mmcblk0, or the installer will create the Ubuntu bootloader on the VCS internal storage. See the image below to see the “Device for boot loader installation” drop-down. This screen will look different on the VCS.

Once you’ve done this, in the window above this option you will need to find those partitions you created earlier. The only one you need to concern yourself with is that third, large ext4 partition we’re going to use for the OS. Right click on it an choose “Change…”.
Choose “ext4 partition” in the drop down, even though you’ve already created this partition. This will open a new option to select a Mount Point. Choose “/” (the single, forward slash). This is the Linux “Root” partition where everything is installed. Click OK to confirm.
Double check that your “Device for bootloader installation” is set to the target drive and not mmcblk0, and that the ext4 partition is set to be the “/” (root) partition. Once you’ve done so, click “Install Now”.
The rest is a pretty easily guided setup.
Note: My installer had a few minor crashes
I’ve done this install several times now, and a few times there were minor crashes that resulted in a few error dialogues that I just ignored. These did not seem to prevent the install from completing or from being bootable.
When the install is complete, you will get a message saying so and to reboot. Do that. It will also ask you to remove the installation media. This means to remove the USB Installer drive, but not the OS drive.
Step 6 – Make Sure AtariOS Still Works
Before taking the new Ubuntu system for a test drive, I like to make sure I can still get into AtariOS, so just let it boot normally. It should boot just fine, but I like to do so anyway. Log into the dashboard then restart the system.
Step 7 – Boot Ubuntu and Install Steam
As the system is restarting, keep pressing Esc to access the BIOS/UEFI and the Boot Manager menu like you did in Step 3. This time you should see the OS drive listed (called “ubuntu”). Choose this option and press Enter.
Depending on the speed of the drive, this may take a few minutes. You should eventually get to a login screen where you can enter the username and password for the account you created during the install. It will take you to the Ubuntu desktop and pop up a quick welcome/setup wizard that you can skip through unless you want to look into any of the options.
Now it’s time to install Steam. After a minute or so you should see an orange App Store icon (“Ubuntu Software”) on the app launcher on the left side of the screen. Open Ubuntu Software and give it a minute to download the software list.
In the upper left, there is a search button. Click this and in the field that appears, enter “Steam”. You’ll see an entry for the “Steam Installer”. This is a two step process. Clicking on this will install and Installer. Yes, you read that correctly. Once it has completed, click on the “Apps” icon in the LOWER left corner and you should see the Steam icon. Click this to begin the second phase. The installer will download the actual Steam client and its updates.
When it is complete, it may present you with the Steam login dialogue. If not, just go back into the Apps menu and click the Steam icon again to bring up the login prompt. Go ahead and log in to make sure it works.
Step 8 – Install Updated Mesa Libraries
On Linux, Mesa is an open source version of OpenGL, Vulkan and other graphics libraries. The version that comes with Ubuntu 20.04 is not quite up to date and some games on Steam do not render properly. I personally had problems with Hollow Knight, Stardew Valley and Apotheon. Installing more recent mesa libraries fixes this. This requires adding an unofficial software repository where you can obtain the more recent mesa libraries.
You will need to open a terminal for this, so click the Apps icon and choose or search for “Terminal” and open it. Once it is open, issue the following commands, entering “Y” or “Yes” when prompted.
sudo add-apt-repository ppa:kisak/kisak-mesa
sudo apt update
sudo apt upgrade
The second command may take several minutes depending on how many updates you have. If there are no errors, you can log out and/or restart the system.
Step 9 – Download some games! (and maybe enable Steam Play)
When the system restarts, once again, press Escape until you get boot menu, then perform the same steps to get back into Ubuntu. Once you are logged in, fire up Steam and download a few games to try.
One option you may want to consider is using “Steam Play”. Valve has integrated a project called “Proton”, which is a Windows emulation layer that allows Windows games to be played on Linux. The results may vary from game to game and depending on the hardware, but so far the results have been impressive. I’ve had some good luck, especially with indie titles.
To enable this in Steam, go to the “Steam” menu -> Settings -> Steam Play then choose “Enable Steam Play for supported titles“. If you’re feeling lucky, you can also “Enable Steam Play for all other titles” and roll the dice to see if your game plays well.
Results So Far
I’ve been quite pleased with the VCS performance with my Steam library so far. For many games it’s not surprising, such as Axiom Verge or Stardew Valley. But Hollow Knight is also playing quite well, the Linux version of Streets of Rage 4 is great, and even a few Windows games are playing well, including Fire Pro Wrestling World and Cuphead.
Bloodstained: Ritual of the Night (another Windows only game) plays, but it’s slow. It’s either the VCS hardware isn’t quite up to the task, or that Proton just isn’t quite up to the task yet. I have, however, been able to stream Bloodstained and even Skyrim from my Windows gaming rig with no problems.
Hopefully this guide helps you get started with Ubuntu and Steam on the VCS. Have fun and let me know how it goes!